You do not need a big budget to create a fabulous Halloween entrance.
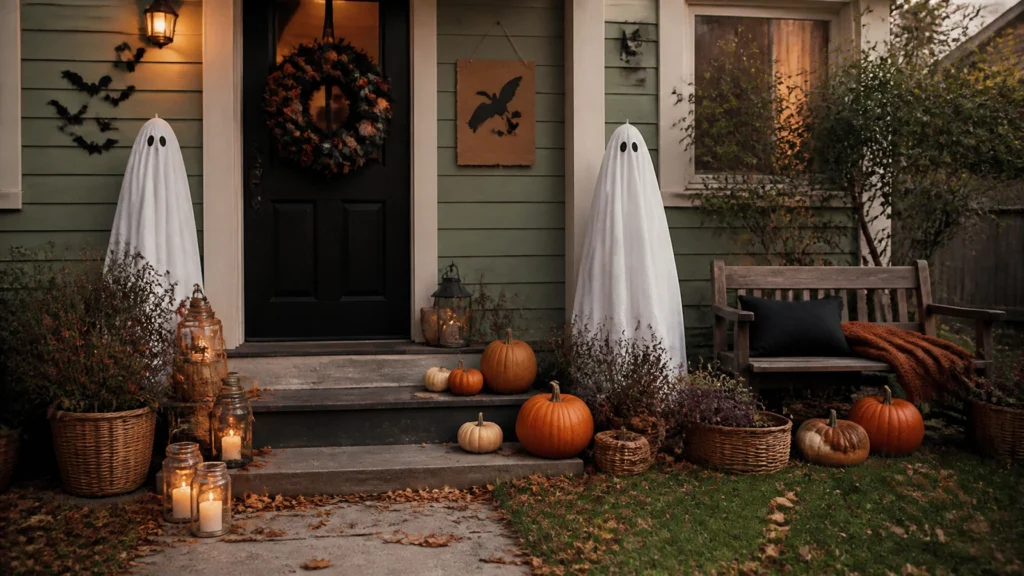
The secret is simple: start with what you already have, thrift the right basics, and repeat a few colors throughout your display. A mismatched porch can become a cohesive, spooky welcome with a wreath, pumpkins, handmade ghosts, and a little creative paint.
This step-by-step plan combines thrift store finds, upcycled household items, dollar store supplies, and easy DIY home decor projects. Most ideas can be completed for between $20 and $60, depending on what you already own.
Start With a Simple Halloween Plan
Before buying anything, walk around your home, garage, basement, and storage areas. Look for useful shapes and surfaces: not perfect Halloween decorations.
Shop your home first
Gather items such as:
- Old sheets, pillowcases, blankets, or curtains
- Cardboard boxes and shipping materials
- Glass jars, bottles, and tin cans
- Worn baskets, planters, and flowerpots
- Picture frames, trays, stools, and small tables
- Scrap wood, fabric, ribbon, yarn, and twine
- Old boots, hats, scarves, and children’s clothing
These everyday items can become ghosts, signs, luminaries, tombstones, and display stands.
Choose a cohesive color palette
Pick three or four colors and repeat them from the doorway to the front yard. A practical Halloween palette is:
- Matte black
- Burnt orange
- Cream white
- Muted sage green
This combination makes thrifted and handmade pieces look intentional. You do not need every item to match. The repeated colors will do the work.
Set a realistic budget
For a small but complete display, plan approximately:
- $5–$15: dollar store supplies, tape, glue, lights, and craft materials
- $10–$25: thrift store frames, baskets, fabric, planters, or furniture
- $5–$20: paint, pumpkins, or seasonal extras
Set your limit before shopping. Then spend your money on items that create the biggest visual impact.
Create a Thrifted Wreath Makeover
A wreath gives your doorway an instant focal point. It does not need to be a Halloween wreath when you find it.
Look for grapevine wreaths, plain faux greenery, old floral wreaths, baskets, or even a circular wall frame. Choose something sturdy with a shape you like.

Follow these simple steps
- Clean the wreath. Remove dusty flowers, faded ribbons, or decorations that no longer fit your style.
- Add color. Brush or spray sections with black, burnt orange, or muted green paint. Let some of the original texture show through.
- Layer inexpensive details. Tie on fabric strips, torn muslin, ribbon, twine, or faux leaves.
- Make handmade accents. Cut bats, moons, or small pumpkins from black paper or thin cardboard.
- Attach everything securely. Use floral wire, hot glue, or strong craft adhesive.
- Finish with one bold detail. Add a large bow, thrifted brooch, small sign, or faux crow.
Keep the design slightly uneven. Handmade details add charm and make the wreath feel personal.
For another pumpkin-themed project, visit The Crafty Renewal’s Pumpkin Wreath Scarecrow.
Upcycle a Wooden Halloween Sign
A sign is one of the easiest ways to make a porch feel decorated. Use a scrap board, an old shelf, a cabinet door, or the back of a thrifted picture frame.
This is also a perfect small project if you are learning how to upcycle furniture. You are practicing cleaning, painting, layering, and finishing on a manageable surface.
Make your sign in five steps
- Prepare the surface. Remove loose hardware and wipe away dirt. Lightly sand rough edges.
- Paint the base. Use black, cream, orange, or sage green. A distressed finish works well for Halloween.
- Add a message. Try “Enter If You Dare,” “Boo,” or “Witch Parking.” Use stencils, vinyl letters, or your own handwriting.
- Add texture. Brush on darker paint around the edges, or lightly sand corners for a weathered look.
- Protect the sign. If it will sit outside, apply an exterior sealer and keep it under a covered porch when possible.
Lean the finished sign against a bench, place it inside a basket, or hang it beside the door.

Make Friendly Sheet Ghosts
Old white sheets and pillowcases can become a group of handmade ghosts for almost no cost.
Gather your supplies
- White sheets, pillowcases, or fabric scraps
- Newspaper, grocery bags, or scrap fabric for stuffing
- Twine or rubber bands
- Black marker or felt
- A lightweight hanger, garden stake, or branch
Build your ghosts
- Create the head. Crumple newspaper or reusable fabric into a ball.
- Cover it. Drape white fabric over the shape.
- Secure the neck. Tie twine loosely underneath the head.
- Add a face. Draw simple eyes and a mouth with a black marker, or attach felt shapes.
- Place the ghost. Hang it from a covered porch, tuck it into a basket, or secure it to a stake.
Make each face different. Uneven eyes and wobbly smiles make the display more playful and handmade.
For a sturdier yard decoration, use cardboard to create bats, cats, or tombstones. Paint them in your palette and attach them to garden stakes or leftover pieces of wood.
Add Dollar Store Luminaries and Pathway Markers
Dollar store supplies are best used for small details that repeat throughout your display.
Buy only the basics:
- Battery-powered LED tea lights
- Black paper or cardstock
- Orange ribbon
- Plastic spiders or small skeletons
- Removable hooks and outdoor-safe tape
- Wooden craft sticks or garden stakes
Make recycled jar luminaries
- Clean empty glass jars and remove labels.
- Wrap the outside with cream tissue paper, or leave the glass clear.
- Draw ghost faces, bats, or simple eyes on the surface.
- Place a battery-powered LED light inside.
- Group the jars on steps, a porch ledge, or a sturdy table.
You can also use clean tin cans. Ask an adult to help create holes in a simple pattern, then place an LED light inside.
Create pathway markers
Cut bat, pumpkin, or ghost shapes from cardboard. Paint them black, orange, or cream. Attach each shape to a craft stick or garden stake and place them along the edge of the walkway.
Keep the markers low and outside the walking path. The goal is to guide guests: not create obstacles.

Build a Layered Pumpkin Display
Pumpkins instantly signal Halloween, but you do not need a large collection of expensive pumpkins.
Mix real pumpkins with thrifted containers, painted foam pumpkins, baskets, and upcycled planters. Vary the heights to create a fuller display.
Use this simple layering formula
- Start with a base. Use a thrifted stool, small bench, crate, basket, or overturned planter.
- Add the largest pumpkin. Place it slightly off-center.
- Layer in smaller pumpkins. Use two or three shapes rather than lining them up evenly.
- Add texture. Tuck in branches, dried leaves, fabric strips, or faux greenery.
- Repeat the palette. Paint a few small pumpkins black, cream, or sage green.
- Finish with lighting. Add a battery-powered lantern or jar luminary nearby.
Do not worry if your pumpkins are different colors or shapes. Place a few matching ribbons or painted accents around the display to connect them.
Create a Budget-Friendly Doorway Focal Point
A focal point gives your porch a finished look. You can create one with a repurposed furniture piece.
Look for a small stool, narrow bench, side table, plant stand, or wooden chair at a thrift store. These pieces are useful examples of repurposed furniture ideas because they add height, storage, and personality without requiring a major makeover.

Refresh the piece
- Clean it thoroughly.
- Sand only rough or peeling areas.
- Paint it matte black, deep green, or warm cream.
- Distress the edges if you want a vintage finish.
- Place it beside the door, not directly in the walkway.
- Style it with pumpkins, a basket, a lantern, or one handmade ghost.
Keep the top of the furniture piece simple. Three or five well-placed objects usually look better than a crowded collection.
For more practical inspiration, explore The Crafty Renewal’s Project Gallery, or browse the digital guides for beginner-friendly project support.
Make Mismatched Décor Look Intentional
Thrifted décor will rarely match perfectly. That is part of the charm.
Use these simple tricks to create a pulled-together display:
- Repeat colors: Paint several small items black or orange.
- Repeat shapes: Use bats, pumpkins, or ghosts in more than one location.
- Vary heights: Combine floor-level pieces with a bench, stool, or wall hanging.
- Group items: Small objects look stronger in clusters of three or five.
- Leave breathing room: Empty space keeps the porch from looking cluttered.
- Use one large anchor: A wreath, sign, bench, or pumpkin grouping should lead the eye.
Think of your display as a before-and-after transformation: random pieces become a coordinated, spooky scene.
Store Everything for Next Year
Good storage helps your budget stretch further.
- Remove batteries from all lights before storing.
- Pack paper bats, signs, and cardboard pieces flat.
- Use labeled plastic tubs for “doorway,” “yard,” and “lighting.”
- Wrap wreaths in a clean sheet or pillowcase to prevent dust.
- Store fabric ghosts in a breathable container.
- Keep fragile glass jars wrapped in newspaper or towels.
- Save leftover paint and label each color.
- Photograph your finished setup before taking it down.
Next Halloween, you can refresh the same pieces with new ribbon, paint, or handmade details instead of starting over.
Follow These Halloween Safety Basics
Before guests arrive, complete a quick safety check:
- Keep walkways, steps, and handrails clear.
- Secure lightweight décor against wind.
- Use outdoor-rated or battery-powered lighting.
- Avoid open flames near paper, fabric, dry leaves, and cardboard.
- Keep cords tucked away and protected from foot traffic.
- Place small or fragile items away from young children and pets.
- Do not block doors, gates, house numbers, or emergency access.
- Check outdoor items after rain or strong weather.
A safe display is a successful display.
Your Budget Halloween Blueprint
Start with one doorway focal point, one pumpkin cluster, and one pathway detail. Then build outward only if your budget allows.
A simple plan could be:
- Thrifted wreath: $3–$10
- Upcycled sign: $0–$8
- Handmade ghosts and bats: $0–$5
- Dollar store lights and supplies: $5–$15
- Pumpkins or painted containers: $5–$20
- Thrifted stool or basket: $5–$15
You can create a welcoming Halloween entrance without buying a complete matching set. Use what you have. Paint what feels tired. Group ordinary items in a clever way.
That is the power of creative upcycling: small supplies, smart styling, and a fabulous result.