A memorable Halloween party does not need an expensive shopping list.
The best setups often combine thrift store treasures, upcycled household items, dollar store supplies, and handmade details. The result feels personal, creative, and completely original.
This guide will help you build a spooky party setup step by step. You will learn how to plan your palette, style the table, create simple decorations, set up food and drinks, entertain kids, and clean up without stress.
The goal is simple: spend less, make more, and create a fabulous Halloween gathering without overwhelm.
Start With a Simple Halloween Party Plan
Before you buy anything, decide what you already have and what you truly need.
Start with these four questions:
- How many guests are coming?
- Which rooms will guests use?
- What food and drinks will you serve?
- What is your total spending limit?
For a small gathering, a realistic budget might look like this:
- $15–$30: decorations and handmade supplies
- $15–$35: food and drinks
- $5–$15: kids’ activities or party favors
- $10–$20: thrifted serving pieces or reusable decor
That puts a simple party in the $45–$100 range, depending on your guest count and what you already own.
Make the menu easier by serving one or two homemade dishes and asking guests to bring a snack, dessert, or drink. A potluck-style Halloween party keeps costs manageable and gives everyone a way to participate.
Choose a Cohesive Color Palette
Mismatched pieces look intentional when they share a consistent color scheme.
Try this easy Halloween palette:
- Matte black for drama
- Burnt orange for warmth
- Cream or ivory to soften the look
- Muted purple or deep green for an extra accent
Use the palette across your tablecloth, napkins, paper crafts, labels, and lighting.
You do not need every item to match. A cream plate, amber glass, and black napkin can look more interesting than a perfectly coordinated set. Repeat one or two colors throughout the room to create a collected, finished look.
This same principle works in other creative projects, too. Whether you are styling a party or exploring repurposed furniture ideas, a limited color palette helps different pieces work together.
Build a Budget-Friendly Tablescape

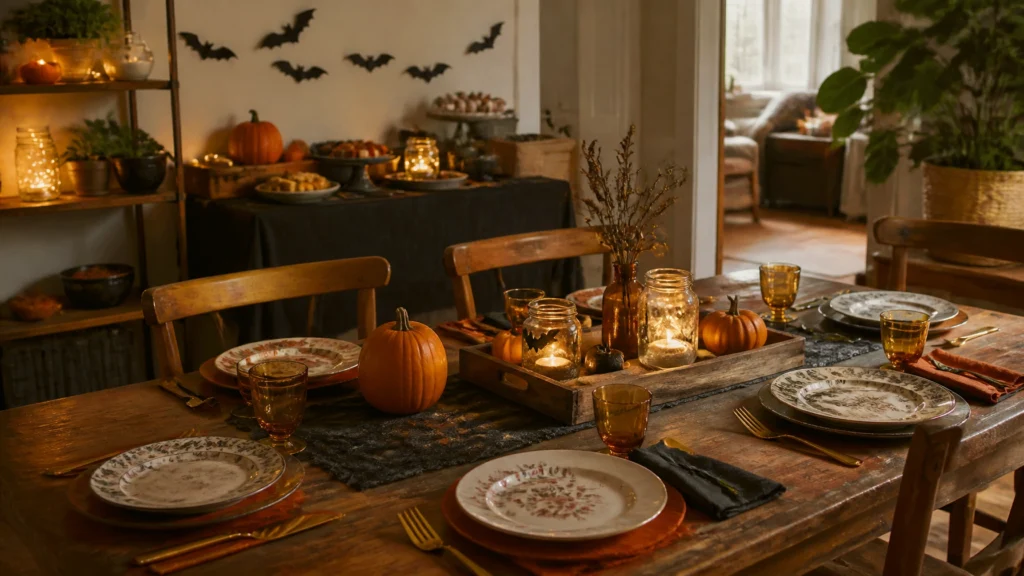
Focus your decorating budget on one main table. A strong focal point makes the whole party feel styled without requiring decorations in every corner.
Step 1: Add a Simple Base
Use one of these inexpensive options:
- A thrifted black tablecloth
- A dark sheet from your linen closet
- A dollar store plastic table cover
- A plain cream cloth with a black runner
For extra texture, layer a strip of cheesecloth, gauze, or an old frayed scarf down the center.
Step 2: Create a Low-Cost Centerpiece
Group items at different heights for a more finished display. Try:
- Thrifted candlesticks with battery-powered candles
- Small pumpkins or gourds
- Repurposed jars filled with faux spiderwebs
- A trick-or-treat bucket filled with candy
- Dark bottles labeled as “potions”
- A thrifted vase filled with bare branches and paper bats
Keep the centerpiece low enough that guests can see across the table. Place tall items toward the back and food toward the front.
A thrifted serving tray is especially useful. The decorative round serving tray from The Crafty Renewal can inspire a practical centerpiece or drink station that is easy to move when guests need more space.
Make Handmade Place Settings and Napkins
You can make each place setting feel special without buying a full set of Halloween dishes.
Use your everyday plates with one handmade accent:
- Tie black twine around a cream napkin.
- Add a paper bat or mini pumpkin to each place.
- Write each guest’s name on a small piece of recycled cardboard.
- Fold dollar store napkins into simple fan shapes.
- Place a plastic spider or skeleton charm on top of each napkin.
For a haunted-mansion look, combine mismatched thrifted plates and glasses. To keep the arrangement intentional, repeat the same napkin color or place every setting on a matching charger, paper mat, or square of kraft paper.
Use only clean, food-safe dishes for serving and eating. Decorative thrift store pieces should stay away from food unless you can confirm they are safe for that purpose.
Create DIY Food and Drink Labels
Simple food becomes party-ready when you give it a spooky name.
Cut label cards from recycled cereal boxes, shipping boxes, or black construction paper. Write with a white paint marker or chalk marker.
Try names such as:
- “Witch’s Brew” for punch
- “Graveyard Dip” for salsa or guacamole
- “Monster Munch” for popcorn
- “Pumpkin Patch Veggies” for a vegetable tray
- “Spider Eggs” for deviled eggs
- “Haunted Brownie Bites” for brownies
Place labels in small thrifted frames, clothespins, or folded cardstock stands.
Set up food in zones so guests know exactly where to go:
- Snacks: popcorn, chips, pretzels, and vegetables
- Main food: sandwiches, chili, pizza, or sliders
- Drinks: punch, water, and labeled cups
- Desserts: cupcakes, cookies, and candy
Keep serving utensils with each dish. Put napkins, cups, and plates at the beginning of the food table so guests can serve themselves easily.
Upcycle Serving Pieces and Trays
Look around your home before buying new servingware.
You can repurpose:
- A wooden tray as a drink station
- A clean wooden crate as a dessert riser
- Cake stands as platforms for pumpkins or candy bowls
- Small bowls as dip containers
- Glass jars as straw holders or candy containers
- A vintage frame as a sign holder
For more upcycling inspiration, browse The Crafty Renewal’s project gallery. A little paint, new hardware, or a careful cleaning can give an overlooked piece a completely different role.
If you are new to refinishing, start small. A tray or crate is a manageable project for anyone exploring DIY furniture refinishing or learning the basics of furniture flipping for beginners.

Add Handmade Halloween Decorations
Handmade decorations provide the biggest visual impact for the smallest cost.
Make a Paper Bat Wall
Fold black paper in half and cut out simple bat shapes. Open the paper and attach the bats to a wall or doorway with removable adhesive.
Arrange them in a loose flying pattern. Start with a few large bats and add smaller ones as they move upward.
Create a Paper Banner
Cut triangles from kraft paper, old magazines, paper grocery bags, or construction paper. Alternate black, orange, and cream pieces.
Write one letter on each triangle to spell:
- HAPPY HALLOWEEN
- BOO
- EEK
- TRICK OR TREAT
Punch two holes in each piece and thread them onto twine.
Make Hanging Ghosts and Spiders
Use lightweight materials such as tissue paper, cotton balls, yarn, and recycled cardboard. Hang paper ghosts from a doorway or suspend cardboard spiders above the food table.
Keep hanging decorations away from light fixtures, heaters, ceiling fans, and walkways.
Set Up an Affordable Photo Corner
Choose one small area for photos instead of decorating the entire room.
Use:
- A dark sheet or thrifted curtain as a backdrop
- Paper bats and a handmade banner
- A few pumpkins or empty boxes covered in fabric
- Battery-powered string lights
- Dollar store costume accessories
- A thrifted chair, stool, or small side table
A repainted thrifted stool can become both a photo prop and a useful piece of home décor after the party. That is the advantage of choosing versatile items: your decorations keep working long after Halloween.

Use Safe, Affordable Lighting
Lighting changes the mood quickly.
Choose:
- Battery-powered string lights inside clear jars
- LED tea lights in thrifted glass containers
- Small lanterns made from clean jars
- Warm white fairy lights under the food table
- Battery-powered candles around the photo area
Avoid open flames near fabric, paper, faux spiderwebs, dry branches, or crowded tables. Never leave candles unattended. Low-heat and battery-powered lighting is the safest choice, especially when children or pets are attending.
Add a Kids’ Craft and Activity Table
A small craft station gives children something to do and helps spread guests throughout the room.
Use a washable table covering and provide:
- Construction paper
- Recycled cardboard
- Glue sticks
- Crayons and washable markers
- Child-safe scissors
- Stickers
- Yarn and twine
- Paper cups for holding supplies
Easy activities include making paper masks, decorating mini treat bags, or creating paper pumpkins.
Store supplies in thrifted bowls, jars, or small boxes. Keep scissors, small pieces, and fragile decorations supervised and away from very young children.
Make Simple Party Favors
Party favors do not need to be expensive.
Try:
- Dollar store treat bags filled with popcorn or candy
- Small thrifted jars filled with wrapped sweets
- Reusable cups with a spooky sticker
- Handmade bookmarks
- Mini craft kits with paper shapes and stickers
- Small decorated paper bags tied with orange ribbon
Buy reusable favor containers when possible. A few dollars spent on sturdy jars, tins, or fabric bags can save money next year.
Plan for Safety and Easy Cleanup
A successful party is easier when cleanup is part of the plan.
Before guests arrive:
- Place trash and recycling bins where everyone can see them.
- Keep food and drinks in one main area.
- Put trays under punch bowls and drink dispensers.
- Use washable table coverings or protective dollar store covers.
- Keep fragile décor away from young children.
- Confirm that thrifted serving items are clean and food-safe.
- Label dishes that contain common allergens when possible.
Refrigerate perishable food until close to serving. Do not leave meat, dairy, mayonnaise-based dips, or cut fruit out for more than two hours, or one hour in very warm conditions. Put out smaller portions and refill them from the refrigerator as needed.
After the party, collect food, cups, and decorations first. Soak serving pieces while you wipe the tables. Separate reusable décor into labeled bins:
- Lighting
- Paper decorations
- Serving pieces
- Craft supplies
- Costumes and props
Wrap delicate items in old towels or newspaper. Store everything in one clearly labeled Halloween container so next year’s setup starts with what you already own.
Save Money by Decorating With a System
The best budget parties rely on a simple blueprint:
- Shop your home first.
- Choose one color palette.
- Decorate one main table and one photo area.
- Use handmade details to personalize the setup.
- Borrow serving pieces instead of buying them.
- Choose reusable items whenever possible.
- Keep the food simple and guest-friendly.
- Store everything for next year.
You do not need a perfect party store display. You need a clear plan, a few clever upgrades, and the confidence to see potential in ordinary items.
That is the heart of upcycling. An old tray becomes a drink station. A plain sheet becomes a photo backdrop. A recycled box becomes a banner. With a little creativity, forgotten pieces can become the most memorable part of your Halloween party.
For more beginner-friendly tools and step-by-step resources, explore The Crafty Renewal’s digital guides and toolkits. Start small, keep it practical, and make your Halloween celebration your own.