A beautiful fall wedding does not require a beautiful-sized budget.
With a clear color palette, a few clever thrift store finds, and simple handmade details, you can create a celebration that feels warm, personal, and intentional. The key is to stop buying random decorations and start building a repeatable design.
Think mismatched to magical. Simple to sophisticated. Budget-friendly to breathtaking.
This step-by-step guide will show you what to thrift, what to make, and what to buy at the dollar store for your ceremony, reception, tables, florals, signs, favors, and photo area.
Step 1: Set a realistic wedding décor budget
Start with your total décor budget. Then divide it by the areas that matter most.
A simple starting plan could look like this:
- 25% for ceremony décor
- 30% for reception tables
- 15% for lighting and candles
- 10% for signs and paper details
- 10% for florals and greenery
- 10% for favors, photo décor, and backup supplies
You do not need to spend equally in every category.
Choose one feature to make special. This could be your ceremony arch, sweetheart table, welcome display, or photo area. Keep the rest simple and repeat the same design elements throughout the day.
Before shopping, make three lists:
- Thrift: Vintage pieces, frames, vases, candleholders, mirrors, textiles, and serving décor.
- Make: Signs, place cards, paper leaves, table numbers, garlands, and fabric details.
- Dollar store: Multiples such as ribbon, jars, LED lights, craft supplies, and basic containers.
This system prevents impulse purchases and makes decorating much easier.
Step 2: Choose a warm fall color palette
A cohesive palette makes inexpensive pieces look collected instead of chaotic.
Try this easy combination:
- Cream or ivory as your base
- Rust orange or terracotta
- Deep burgundy
- Warm brown
- Muted sage or olive green
- Small touches of brass, copper, or antique gold
Use your palette consistently in your flowers, ribbons, stationery, table linens, and signage.
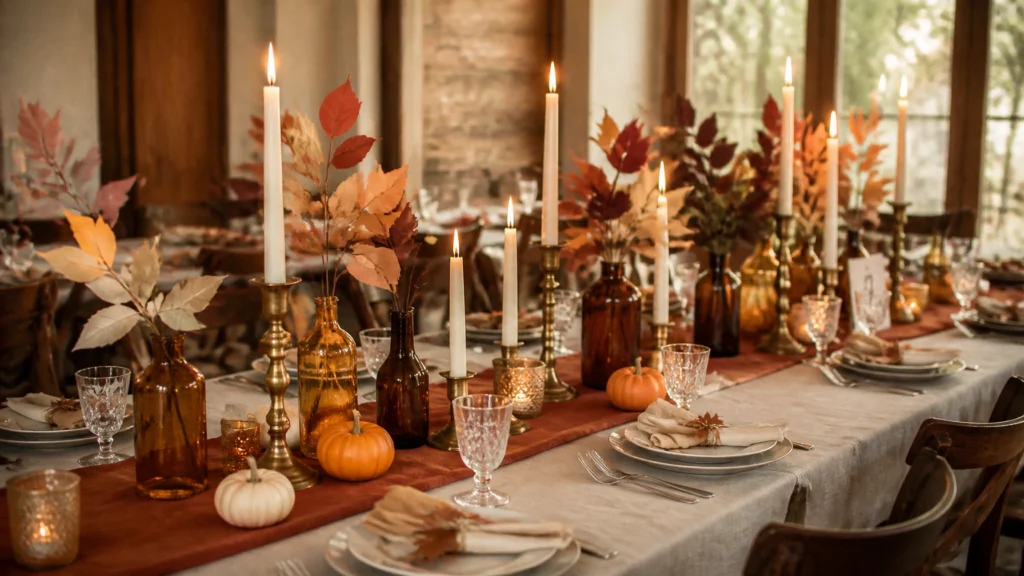
You do not need every item to match. In fact, mismatched pieces can create more personality. Keep the shapes and colors connected instead. For example, combine different glass vases in amber, clear, and smoky tones. Add cream flowers and rust-colored ribbon to tie everything together.
Step 3: Build an inviting ceremony backdrop

Your ceremony does not need an expensive floral installation. It needs one strong focal point.
Thrift
Look for:
- Wooden ladders or folding screens
- Vintage mirrors
- Large baskets
- Brass lanterns
- Long curtains or neutral fabric
- Wicker or wooden crates
- Artificial greenery in good condition
Inspect every structural item carefully. Do not use a wobbly ladder, cracked screen, or unstable piece as part of your ceremony setup.
Make
Create a simple backdrop by draping thrifted cream curtains over a sturdy arch or frame. Tie the fabric back with ribbon, twine, or handmade fabric strips.
Add a small arrangement of dried grasses, faux leaves, or seasonal flowers to one side. Asymmetrical decorating uses fewer materials but still creates a polished result.
You can also make a paper leaf garland. Cut leaves from cardstock in cream, rust, and burgundy. Punch small holes near the stems and string them onto twine.
Dollar store
Buy:
- Cardstock
- Twine or ribbon
- Faux leaves
- Small LED lights
- Floral tape
- Zip ties
- Battery-operated candles
Use zip ties to secure lightweight decorations. Never attach décor in a way that blocks exits, creates a trip hazard, or could fall onto guests.
Step 4: Create affordable aisle markers
Aisle markers are a small detail with a big visual effect.
Gather glass jars, small baskets, or metal buckets. Fill them with dried leaves, faux greenery, wheat stems, or a few seasonal flowers. Tie a ribbon around each container and attach them to ceremony chairs or shepherd’s hooks, where permitted.
For a grounded aisle design, group mini pumpkins, pinecones, and baskets at the ends of each row. Use fewer clusters rather than placing something at every chair.
Affordable aisle supply list
- Thrifted jars, baskets, or small vases
- Mini pumpkins or gourds
- Faux leaves or dried foliage
- Rust, cream, or burgundy ribbon
- Floral foam for suitable containers
- Battery-operated LED lights
- Clear hooks, zip ties, or approved chair clips
Keep aisle décor away from feet and walking paths. Secure loose fabric and check the area before guests arrive.
Step 5: Make centerpieces that look collected

The easiest centerpiece formula is:
One base + varied height + soft light + one seasonal accent.
Start with a wood slice, thrifted tray, or neutral charger. Add two or three glass containers at different heights. Finish with candles, flowers, and a small fall detail.
Thrift
Search for:
- Amber glass vases
- Bud vases
- Vintage candleholders
- Clear glass cylinders
- Wooden trays
- Small bowls
- Brass or copper containers
- Neutral table runners
Make
Use dried branches, paper leaves, fabric napkin ties, or handwritten table numbers. You can also make a simple centerpiece using grocery-store flowers. Divide one larger bouquet into several small arrangements instead of placing one expensive arrangement on each table.
Choose seasonal flowers such as mums, sunflowers, carnations, dahlias, or eucalyptus. Mix fresh flowers with dried grasses and faux foliage to stretch your budget.
Dollar store
Buy:
- Plain glass jars
- Battery-operated tea lights
- Ribbon
- Faux pumpkins
- Floral wire
- Floral tape
- Simple table runners
Repeat the same formula on every table. The pieces do not need to be identical. They only need to feel related.
Step 6: Style an elegant table setting
Begin with a clean foundation. Use neutral tablecloths, runners, or napkins. Then layer in the fall colors through small details.
Try this arrangement:
- Place a cream or neutral napkin at each setting.
- Add a rust or burgundy ribbon around the napkin.
- Tuck in a small dried leaf, sprig, or paper tag.
- Place a simple handmade name card above the plate.
- Add one small seasonal accent near the centerpiece.
Thrifted plates and glasses can look beautiful, but inspect them for chips, cracks, cloudiness, or damage. Clean and sanitize all reusable tableware thoroughly before the event.
Do not assume a dollar store container is suitable for food contact. Use food only with items specifically labeled and intended for that purpose. For other containers, use them strictly for decorative elements, wrapped favors, or sealed packaging.
Step 7: Create welcome signs, seating charts, and place cards

Thrift stores are excellent sources for affordable sign frames.
Look for large frames in wood, brass, black, or antique gold. Remove old artwork, clean the frame, and insert your own printed sign. A simple cream background with dark lettering will look timeless.
Use the same style for:
- Welcome signs
- Seating charts
- Bar menus
- Dessert labels
- Table numbers
- Cards and gifts signs
For place cards, cut cardstock into small rectangles and write names with a dark marker. Add a tiny paper leaf or pressed-style faux botanical detail.
If you need inexpensive printable inspiration, browse The Crafty Renewal’s digital collection. For custom décor or a personalized project, visit the project request page.
Step 8: Add candlelight safely
Candles create the warm glow that makes fall weddings feel magical. They also require careful planning.
First, check your venue’s rules. Some locations allow only enclosed flames. Others require LED candles throughout the event.
For real candles:
- Use sturdy glass holders or hurricane containers.
- Keep flames away from fabric, paper, dried flowers, leaves, and wood.
- Place candleholders on level, stable surfaces.
- Keep open flames out of walkways and high-traffic areas.
- Do not leave candles unattended.
- Assign someone to extinguish them before dancing or cleanup.
Use LED candles near the ceremony arch, photo area, children’s seating, draped fabric, or outdoor pathways. Outdoors, wind can tip flames or spread sparks. Enclosed lanterns and battery-operated lights are safer choices.
Step 9: Create affordable favors
Choose favors that are useful, edible, or easy for guests to take home.
Ideas include:
- Small sealed packets of cocoa or tea
- Wrapped homemade cookies
- Mini jars filled by a food-safe source
- Seed packets
- Handmade sachets
- Small thrifted-style ornaments
- Personalized thank-you tags
Use dollar store kraft bags, ribbon, stickers, and cardstock for packaging. Keep edible items sealed and clearly labeled. Never place food directly into a decorative container unless it is specifically made and approved for food use.
Step 10: Set up a simple photo area

Choose one comfortable corner instead of decorating the entire venue.
Start with a thrifted loveseat, chair, or bench. Add a plaid blanket, a vintage mirror, pumpkins, and a paper leaf garland. Drape warm white string lights behind the seating area, keeping cords secured and away from walkways.
A blank vintage frame can also become a fun photo prop. Avoid fragile glass if guests will be holding it. Use a lightweight empty frame or remove the glass first.
Before the event, test the lighting at the same time of day as your reception. A photo area that looks lovely in daylight may need extra light after sunset.
Clean, coordinate, and finish with confidence
Give yourself time to clean every secondhand item.
- Wash fabrics according to their care instructions.
- Clean glass with warm soapy water and dry it completely.
- Wipe sealed wood and metal with an appropriate cleaner.
- Discard chipped, cracked, rusty, or unstable pieces.
- Check every cord, light strand, hook, and holder.
- Keep a repair kit ready with tape, scissors, zip ties, glue, and extra batteries.
Finally, arrange your décor before the wedding day. Photograph each table and setup. Label storage bins by location. Give your helpers a simple setup guide.
Your goal is not perfect matching. Your goal is a thoughtful experience with a consistent look.
With thrifted treasures, handmade touches, and smart dollar store basics, you can create a fall wedding that feels warm, elegant, and completely yours: without overspending or overwhelming yourself. Start small. Follow the system. Let every affordable detail tell part of your story.