Hosting a July 4th picnic shouldn’t feel like a high-stakes design challenge. You want to celebrate with friends and family, enjoy some great food, and set a festive mood: all without draining your bank account. The truth is, some of the most charming patriotic decor doesn’t come from a big-box store. It comes from your recycling bin, your local thrift store, and your own creative spirit.
At The Crafty Renewal, I believe in the power of upcycling to turn the “forgotten” into the “fabulous.” You don’t need a massive budget to create a stunning tablescape. You just need a plan and a few DIY tricks to give old items a fresh, patriotic life.
Ready to transform your outdoor space? Start with these budget-friendly, beginner-approved ideas to make your picnic table the star of the show.
Shop Your Home and Thrift the Foundation
Before you rush out to buy a plastic tablecloth that will end up in the trash by July 5th, look around your house. The best foundations for a picnic table are often textiles that have a history.
- Find a Canvas: Look for old white bedsheets, drop cloths, or even light-colored curtains at thrift stores. A simple white base allows your red and blue accents to pop.
- Layer with Purpose: Scour the linens section for denim scraps, red-checkered napkins, or blue striped fabric. A single long strip of denim can act as a rustic table runner that lasts for years.
- Embrace the Quilt: If you have a vintage quilt with red or blue tones, drape it over the table. It adds instant farmhouse charm and feels much more intentional than a store-bought plastic cover.
By using real fabric, you aren’t just saving money; you’re creating a high-end look that feels cozy and curated. If you’re worried about spills, remember that most of these thrifted items are machine-washable and more durable than paper alternatives.
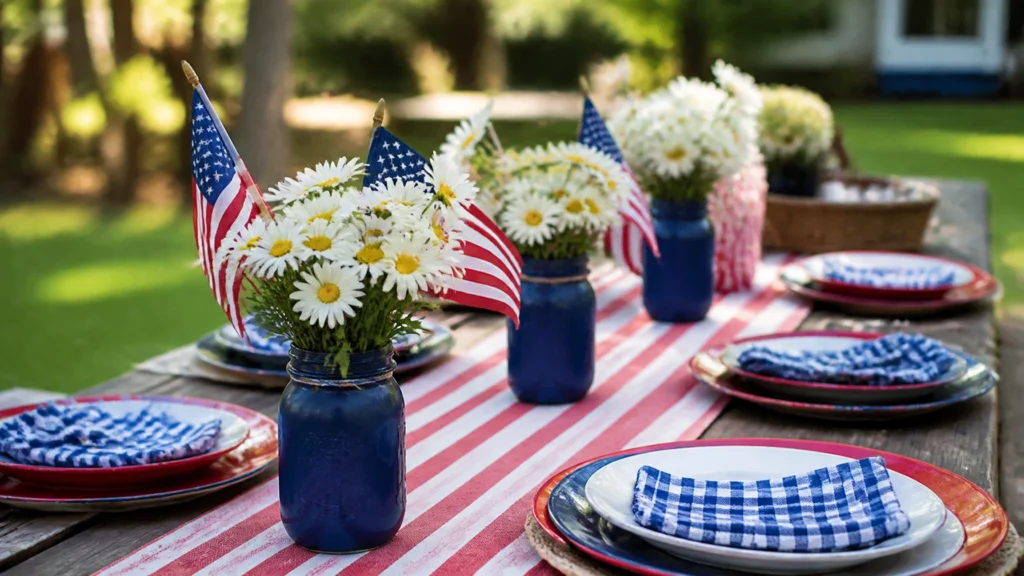
Create Iconic Centerpieces from Recycled Jars
Centerpieces often eat up a huge chunk of a decorating budget, but they don’t have to. You likely have everything you need in your kitchen pantry right now.

The Patriotic Jar Trio
This is the ultimate beginner project. It requires minimal tools and delivers a huge impact.
- Collect: Save three glass jars: pasta sauce jars, mason jars, or even large jam jars work perfectly.
- Clean: Soak them in warm soapy water to remove labels.
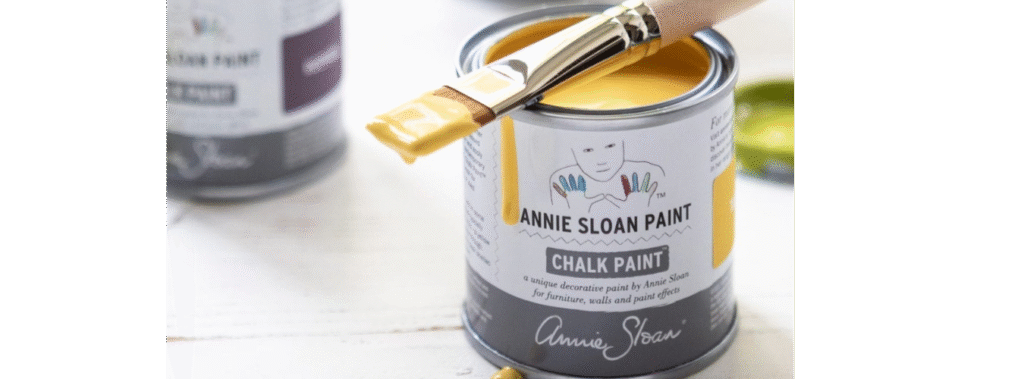
- Paint: Use a small amount of acrylic or chalk paint to coat the outside. Choose one red, one white, and one blue. If you need help choosing the perfect patriotic shades that won’t look “neon,” check out my Paint Brand Guide for my favorite tried-and-true colors.
- Distress: Once dry, lightly rub a piece of sandpaper over the raised edges of the jar. This gives them that coveted rustic, farmhouse feel.
- Fill: Add water and a handful of white daisies or baby’s breath. Stick a small American flag into each one for the final touch.
This “Problem vs. Solution” approach is simple: The problem is a boring, empty table. The solution is a set of upcycled jars that cost literally pennies but look like they came from a boutique.
Build a Custom Utensil Caddy
Nothing ruins a picnic faster than napkins blowing away or having to hunt for a fork. Keep your table organized and stylish by upcycling a simple container into a “Grab & Go” station.

The Cardboard to Classic Flip
Don’t throw away that four-pack drink carrier from the brewery or coffee shop. It is a goldmine for organization.
- Sturdy It Up: If the cardboard feels flimsy, give it a quick coat of primer.
- Paint It: A crisp white or a deep navy blue works best. This is a great time to practice your technique if you’re new to furniture flipping. My Beginner Furniture Flip System teaches these exact prep and painting skills on a larger scale, but a small caddy is the perfect “starter” project.
- Detail It: Use a stencil or a permanent marker to label the sections: “Forks,” “Spoons,” and “Napkins.”
- Protect It: If you’re expecting a humid day, a quick spray of clear sealer will keep your paint from getting tacky.
For more inspiration on small-scale projects like this, take a look at our Project Gallery. You’ll see how a little paint can completely change the vibe of everyday objects.
Level Up Your Place Settings
You don’t need “Fourth of July” themed plates to make a statement. You can dress up your everyday white dishes with a few handmade touches.

Simple DIY Napkin Rings
Skip the expensive ring sets. Instead, use items you already have.
- Twine and Stars: Tie a simple piece of jute twine around a folded blue napkin. Tuck in a small wooden star (available at any craft store) or even a sprig of fresh rosemary from the garden for a natural touch.
- Toilet Paper Roll Hack: Cut empty cardboard rolls into 1.5-inch rings. Wrap them in leftover fabric scraps or even red-and-white striped ribbon. Secure with hot glue. They look incredibly professional once they’re on the table!
- Bandana Napkins: Bandanas are usually about $1 at craft stores. They make excellent, oversized napkins that add a massive splash of color and are much more durable than paper.
By focusing on these small details, you show your guests that you’ve put thought into the experience. It’s about creating a “fabulous” result with a “functional” mindset.
Light Up the Night
If your picnic is going to stretch into the evening, you need lighting that feels magical but doesn’t require an electrician.
- Jar Lanterns: Fill empty jars with about two inches of sand or white rice. Nestle a battery-operated tea light inside. The rice or sand stabilizes the candle and adds a beachy, summer texture.
- String Light Glow: If you have white Christmas lights in the attic, don’t leave them there until December! Drape them along the center of the table, weaving them between your jar centerpieces and the utensil caddy.
- Tin Can Lanterns: This is a classic DIY. Fill empty tin cans with water and freeze them. Once frozen, use a hammer and nail to punch star patterns into the sides. Melt the ice, dry the can, and drop in a candle. The light will shine through the star patterns for a beautiful patriotic glow.
Start Your Upcycling Journey Today
Decorating for the 4th of July is the perfect entry point into the world of furniture flipping and home DIY. These small projects: painting jars, refreshing linens, and building caddies: are the building blocks of larger home transformations.
If you love the idea of turning “trash to treasure” but feel a bit overwhelmed by the process, I’m here to help. I’ve lived through the trial and error so you don’t have to.
- Learn the Basics: My Beginner Furniture Flip System is a step-by-step blueprint that takes you from finding the right piece to a finished, professional-looking flip.
- Choose Your Colors: Don’t guess which blue will look best under the sun. Grab my Paint Brand Guide for expert recommendations.
- Get Inspired: Explore more budget-friendly ideas on our blog.
Your Turn: Pick one idea from this list: maybe those painted mason jars: and commit to making them this weekend. You’ll be amazed at how much confidence a little paint and a lot of creativity can give you.
Happy 4th of July, and happy crafting!